Introduction
Siguldry is a set of services to isolate and manage signing keys.
It consists of a server, which generates and protects the signing keys, a client, and a “bridge” which both the server and client connect to in order to communicate. A PKCS #11 module, which is the primary way signing is performed, is also provided.
Siguldry was heavily inspired by Sigul and shares many of its design choices.
Installation
Distribution repositories
Siguldry is packaged for Fedora and EPEL 10 as siguldry:
$ sudo dnf install siguldry
This package includes the server, bridge, and client.
The PKCS #11 module is also available in Fedora and EPEL 10 as siguldry-pkcs11 and should be installed
on clients that plan to perform signing:
$ sudo dnf install siguldry-pkcs11
Crates.io
Siguldry is also available on crate.io. The Minimum Supported Rust Version (MSRV) will always be less than or equal to the version available in the latest point release of Red Hat Enterprise Linux. For example, with RHEL 10.1 being available, the MSRV is 1.88. It can be installed with cargo:
cargo install siguldry
You will need several header packages installed when using this method:
cargoclangfor libsqlite3-sysopensslheaders (provided byopenssl-develin Fedora andlibssl-devin Debian)sqliteheaders (provided bysqlite-develin Fedora andlibsqlite3-devin Debian)
Be aware, however, that the provided systemd units expect some binaries to be installed into
/usr/libexec/.
The PKCS #11 module is not available to install from crates.io since it only provides a dynamic library and cargo will not install crates without a binary.
Configuration
The server, bridge, and client configurations are written in TOML. By default, the configurations
are loaded relative the the CONFIGURATION_DIRECTORY environment variable and named server.toml,
bridge.toml, and client.toml respectively. Systemd sets the CONFIGURATION_DIRECTORY variable
automatically in the provided systemd unit files, and if run as a system service the default
directory is /etc/siguldry/.
Note
For production deployments, it is expected that the server, bridge, and any clients are separate hosts.
Systemd units
Units may need to be granted access to additional directories or devices. The defaults minimize what they have access to. Common cases are called out, but be aware that the systemd units will require overrides.
Socket units may need their MaxConnections settings raised, depending on how many concurrent requests are allowed.
systemd-creds
None of the configuration files contain any secrets directly. All secrets are provided via file paths and these files should be encrypted with systemd-creds.
systemd-creds allows you to encrypt secrets using a root-owned host key, a TPM2 device, or both.
It also includes the ability to seal the secret to a set of PCR values in various ways. How you
choose to set it up is left as an exercise to the reader.
Once you’ve decided on the configuration, you can encrypt any necessary secrets. For example, here’s how to generate a new key pair with OpenSSL, along with a certificate signing request for an associated X.509 certificate:
openssl req -new -nodes -sha256 \
    -subj "/CN=siguldry-server.example.com" \
    -keyout - \
    -newkey rsa:4096 \
    -out example.csr | \
    sudo systemd-creds encrypt - \
    /etc/credstore.encrypted/siguldry.server.private_key.pem
This generates the private key and pipes it directly to systemd-creds to be encrypted. The systemd
units are configured to load and decrypt any credentials that begin with siguldry.
Within the configuration files, secret files should be referred to by the path relative to
/etc/credstore.encrypted/ or /etc/credstore/. For the above example, you would set something
like the following when referencing a secret:
private_key = "siguldry.server.private_key.pem"
X.509 Certificates
The server, bridge, and client all make use of X.509 certificates for mutual authentication when connecting over TLS.
-
Both server and client connect to the bridge. Both server and client check to ensure the certificate presented by the bridge includes a
subjectAltNameentry that matches the DNS name. -
Both server and client present client certificates to the bridge for mutual TLS authenticate. These certificates MUST include the
clientAuthextended key usage. The bridge only checks that the certificate presented is signed by the expected Certificate Authority. -
The client connects to the server through the bridge and checks to ensure the certificate presented by the server matches the name in the client configuration file. The client presents its client certificate to the server. The server uses the Common Name field of the client’s certificate as the username. User setup will be covered in the administration section, but be aware that the name used when creating the user must match the value of the Common Name.
You will need to generate a set of keys and TLS certificates for the server, bridge, and one or more clients.
As an example, the following bash script creates a valid set of key pairs and X.509 certificates for a server, bridge, and single client.
Caution
This script does not encrypt any of the secret keys and should not be used for production credentials
#!/bin/bash

# If you already have a way to issue TLS certificates, it is recommended that
# you use that flow.
#
# For reference, the following is how to generate a complete set of
# certificates.  Note that for production environments, care should be taken to
# encrypt and protect the private keys generated. The recommended approach is
# to use systemd-creds.
#
# This script accepts three or more arguments: the server commonName, the
# bridge commonName, and one or more client commonNames.
#
# For testing purposes, when all three services run on a single host,
# "siguldry-server", "localhost", and "siguldry-client" are recommended.

set -xeuo pipefail

SERVER_CN="${1}"
BRIDGE_CN="${2}"
if [[ $# -lt 3 ]]; then
    CLIENT_CNS=("")
else
    CLIENT_CNS=("${@:3}")
fi

mkdir -p creds/
pushd creds

# First, create a certificate authority which is used to sign all our certificates.
openssl req -x509 -new -nodes -sha256 \
    -days 3650 \
    -extensions v3_ca \
    -subj "/CN=Siguldry CA" \
    -newkey rsa:2048 \
    -keyout siguldry.ca.private_key.pem \
    -out siguldry.ca_certificate.pem

# Create and sign a server certificate
#
# The server uses its certificate both as a client connecting to the bridge, and
# as a server the client connects to via the bridge. The certificate for the
# server must have the `clientAuth` _and_ `serverAuth` extended key usage
# extensions.
#
# Since the client only communicates through the bridge, and because the server
# initiates the connection to the bridge, the server's name does not need to
# resolve, but it does need to match what the client has been configured to
# accept.
openssl req -new -nodes -sha256 \
    -addext "subjectAltName = DNS:$SERVER_CN" \
    -addext "extendedKeyUsage = clientAuth,serverAuth" \
    -subj "/CN=$SERVER_CN" \
    -newkey rsa:2048 \
    -keyout siguldry.server.private_key.pem \
    -out server-cert.csr
openssl x509 -req -in server-cert.csr \
    -CAkey siguldry.ca.private_key.pem \
    -CA siguldry.ca_certificate.pem \
    -copy_extensions copyall \
    -days 3650 \
    -sha256 \
    -out siguldry.server.certificate.pem

# Create and sign a bridge certificate
#
# The bridge accepts connections from the server and the client. It needs the
# `serverAuth` extended key usage extension, and its name must resolve for both
# the client and server.
openssl req -new -nodes -sha256 \
    -addext "subjectAltName = DNS:$BRIDGE_CN" \
    -addext "extendedKeyUsage = serverAuth" \
    -subj "/CN=$BRIDGE_CN" \
    -newkey rsa:2048 \
    -keyout siguldry.bridge.private_key.pem \
    -out bridge-cert.csr
openssl x509 -req -in bridge-cert.csr \
    -CAkey siguldry.ca.private_key.pem \
    -CA siguldry.ca_certificate.pem \
    -copy_extensions copyall \
    -days 3650 \
    -sha256 \
    -out siguldry.bridge.certificate.pem

# Create and sign client certificates
#
# Each client needs a certificate to authenticate with. The common name of the
# certificate must match the username that we create on the Siguldry server
# later.
for CLIENT_CN in "${CLIENT_CNS[@]}"; do
    openssl req -new -nodes -sha256 \
        -addext "extendedKeyUsage = clientAuth" \
        -subj "/CN=$CLIENT_CN" \
        -newkey rsa:2048 \
        -keyout "siguldry.$CLIENT_CN.private_key.pem" \
        -out "siguldry.$CLIENT_CN.csr"
    openssl x509 -req -in "siguldry.$CLIENT_CN.csr" \
        -CAkey siguldry.ca.private_key.pem \
        -CA siguldry.ca_certificate.pem \
        -copy_extensions copyall \
        -days 3650 \
        -sha256 \
        -out "siguldry.$CLIENT_CN.certificate.pem"
done

rm -- siguldry.ca.private_key.pem *.csr

openssl verify -CAfile ./siguldry.ca_certificate.pem siguldry.server.certificate.pem
openssl verify -CAfile ./siguldry.ca_certificate.pem siguldry.bridge.certificate.pem
for CLIENT_CN in "${CLIENT_CNS[@]}"; do
    openssl verify -CAfile ./siguldry.ca_certificate.pem "siguldry.$CLIENT_CN.certificate.pem"
done

popd
Use the above script as an inspiration and encrypt all the private keys with systemd-creds. With
your credentials in hand, you can now configure the services.
Server Configuration
An example server configuration:
# An example server configuration

# The location where the server should store its state.
#
# To back up the service, back up this directory.
state_directory = "/var/lib/siguldry/"

# The hostname of the Siguldry bridge; this is used to verify the bridge's
# TLS certificate.
bridge_hostname = "bridge.example.com"

# The port to use when connecting to the Siguldry bridge
bridge_port = 44333

# The number of ready connections to maintain with the bridge. This decreases the latency of
# responses when multiple client connections are established, at the expense of some idle
# connections. Be aware that the bridge has its own limits on the allowable number of idle
# server connections. If you use multiple servers with a single bridge, be sure that the
# bridge allows enough idle connections to cover each server's pool size. The default is 32.
connection_pool_size = 32

# The minimum length for user's access password, in *bytes*. For example, the multi-byte
# UTF-8 character "🪿" counts as 4 bytes.
user_password_length = 32

# The user ID to use when creating OpenPGP keys.
#
# This is typically an email like "Signing Key <signing@example.com>".
openpgp_user_id = "Test Signing <sign@example.com>"

# The set of certificates to encrypt passwords with.
#
# At least one entry should include a PKCS#11 URI for a private key. Signing keys are encrypted
# using each certificate, so providing more than one binding means *any* of the private keys
# associated with the certificates will allow you to access the signing key, assuming you have
# the user-set password for the key as well.
#
# When binding is used, the admin needs to unlock the token by entering the PIN using
# "siguldry-server enter-pin".
#
# If no bindings are configured, the keys are protected using only the user-provided
# password.
#
# An example binding entry:
#
# [[pkcs11_bindings]]
# certificate = "/path/to/cert.pem"
# private_key = "pkcs11:token=some-token;type=private"
#
# [[pkcs11_bindings]]
# certificate = "/path/to/a/second/cert.pem"
pkcs11_bindings = []

# The credentials to use when connecting to the bridge and when accepting client connections
# tunneled through the bridge. Note that the certificate must have both `clientAuth` and
# `serverAuth` in its extended key usage extension.
#
# It is expected that you store the private key in /etc/credstore.encrypted/ and the certificates
# in /etc/credstore/ (no encryption necessary).
[credentials]
private_key = "siguldry.server.private_key.pem"
certificate = "siguldry.server.certificate.pem"
ca_certificate = "siguldry.ca_certificate.pem"

# Certificates created by Siguldry allow the user to specify the subject's common name.
#
# The rest of the certificate's subject is specified here.
[certificate_subject]
country = "US"
state_or_province = "Massachusetts"
locality = "Cambridge"
organization = "An Example Organization"
organizational_unit = "Example Department of the Organization"
By default, this is loaded from /etc/siguldry/server.toml.
Hardware Signing Key
In the event you plan to use signing keys stored in hardware security modules, you need to configure
the siguldry-signer@.service unit to have access to it. Add a systemd override file with the
appropriate
DeviceAllow
directives.
Bridge Configuration
An example bridge configuration:
# This is an example bridge configuration.

# The socket address to listen on for incoming connections from Siguldry servers.
#
# The default is to listen on all interfaces on port 44333.
server_listening_address = "[::]:44333"

# The socket address to listen on for incoming connections from Siguldry clients.
#
# The default is to listen on all interfaces on port 44334.
client_listening_address = "[::]:44334"

# The TLS credentials for the server and client listeners.
#
# Both clients and servers connect to the above addresses and perform mutual TLS.
# Note that the certificate must have `serverAuth` in its extended key usage extension.
[credentials]
private_key = "siguldry.bridge.private_key.pem"
certificate = "siguldry.bridge.certificate.pem"
ca_certificate = "siguldry.ca_certificate.pem"
By default, this is loaded from /etc/siguldry/bridge.toml.
Client Configuration
An example client configuration:
# An example client configuration

# The Siguldry server hostname. This is used to validate the server's TLS certificate.
#
# However, since the client connects through the bridge, no DNS resolution is performed.
# This name just needs to match what is in the server's certificate.
server_hostname = "server.example.com"

# The Siguldry bridge hostname. This is used to validate the bridge's TLS certificate.
bridge_hostname = "bridge.example.com"

# The port on the Siguldry bridge to connect to; the default is 44334.
bridge_port = 44334

# A list of keys to unlock for the client.
#
# This can be set for users of the client who can't (or don't want to) call unlock or safely
# store a password. One example would be the PKCS#11 module used inside a build environment.
#
# An example entry:
#
# [[keys]]
# key_name = "signing-key"
# # Store this encrypted in /etc/credstore.encrypted/
# passphrase_path = "siguldry.signing_key.passphrase"
keys = []

# The time, in seconds, to leave an idle connection to the signing server open.
#
# Idle time is measured from the last time the client sent a request to the server,
# and clients transparently restart the connection on the next request. The server
# will also shut down idle client connections after a time (in a much less graceful
# manner) so this value should be somewhat less than the server-set timeout. It should
# also be *larger* than the `request_timeout` setting.
#
# The default idle timeout is 600 (10 minutes).
idle_timeout = 600

# The amount of time, in seconds, to wait before giving up on a request and retrying.
#
# This covers both sending requests and receiving responses. In other words, the client
# will retry the request on a new connection if it cannot write the request to the socket
# within `request_timeout`, *and* it will retry if it fails to read a response to that
# request from the socket within `request_timeout`.
request_timeout = 30

# The credentials to use when authenticating to the Siguldry bridge and server. Note that
# the certificate must have the `clientAuth` extended key usage extension.
[credentials]
private_key = "siguldry.client.private_key.pem"
certificate = "siguldry.client.certificate.pem"
ca_certificate = "siguldry.ca_certificate.pem"
By default, this is loaded from /etc/siguldry/client.toml.
siguldy-fedora-autopen
If you’re looking to automatically sign content from AMQP messages, and you happen to also be using
Koji, the siguldry-fedora-autopen application is what you’re looking for. It should be configured
on a host where a client configuration also exists, and any signing keys it uses must be configured
to be automatically unlocked by the client.
The siguldry-fedora-autopen.service requires that the siguldry-client-proxy.socket systemd socket is active and accessible to the service. Its default configuration file location when running as a system service is /etc/siguldry/fedora-autopen.toml. Its configuration is similar, but not identical, to the robosignatory service it replaces.
An example configuration:
[amqp]
amqp_url = "amqps://fedora:@rabbitmq.fedoraproject.org/%2Fpublic_pubsub?auth_mechanism=external"

[amqp.tls]
ca_certificate = "/etc/fedora-messaging/cacert.pem"
private_key = "/etc/fedora-messaging/fedora-key.pem"
certificate = "/etc/fedora-messaging/fedora-cert.pem"

[[amqp.bindings]]
exchange = "amq.topic"
routing_keys = [
    "org.fedoraproject.*.buildsys.tag",
    "org.fedoraproject.*.coreos.build.request.artifacts-sign",
    "org.fedoraproject.*.pungi.compose.ostree",
]

[siguldry]
client_proxy_socket = "/run/siguldry-client-proxy/siguldry-client-proxy.socket"
concurrency = 128

[koji]
url = "https://koji.fedoraproject.org/kojihub"
instance = "primary"
# Enabling the readonly setting below will turn off any Koji write operations.
# This is only really useful for local testing against a public Koji instance.
#readonly = true

[koji.auth]
authmethod = "kerberos"
principal = "jcline@FEDORAPROJECT.ORG"

[[koji.tags]]
from = "f45-signing-pending"
to = "f45-updates-testing-pending"
siguldry_key = "fedora-45"
siguldry_openpgp_cert = "fedora-45-openpgp"
trusted_taggers = ["bodhi"]

[koji.tags.file_signing_key]
siguldry_key = "fedora-45-ima"
siguldry_x509_cert = "fedora-45-ima-x509"

[koji.tags.sidetags]
from_regex = "(?P<sidetag>f45-build-side-[1-9][0-9]*)-signing-pending"
to_template = "<sidetag>-testing-pending"

[[koji.resign_tags]]
name = "f45"
siguldry_key = "fedora-46"
siguldry_openpgp_cert = "fedora-46-openpgp"

[koji.resign_tags.file_signing_key]
siguldry_key = "fedora-46-ima"
siguldry_x509_cert = "fedora-46-ima-x509"


[rpm]
signing_tool = "gpg"
with_rpmv4 = true

[[ostree]]
reference = "fedora/rawhide/x86_64/iot"
directory = "/mnt/fedora_koji/koji/compose/iot/repo/"
siguldry_key = "fedora-45"
siguldry_openpgp_cert = "fedora-45-openpgp"

[[ostree]]
reference = "fedora/rawhide/aarch64/iot"
directory = "/mnt/fedora_koji/koji/compose/iot/repo/"
siguldry_key = "fedora-45"
siguldry_openpgp_cert = "fedora-45-openpgp"

[coreos]
aws_region = "us-east-2"
aws_bucket = "fcos-builds"
aws_access_key = "some-access-key"
aws_access_secret = "secret key"
signing_tool = "gpg"

[[coreos.keys]]
build_version = 45
siguldry_key =  "fedora-45"
siguldry_openpgp_cert = "fedora-45-openpgp"

[metrics]
http_listener = "127.0.0.1:9000"
Administrator’s Guide
The server side of Siguldry is made up of two components. The server itself, and a proxy called the bridge. The server communicates with the bridge using mutual TLS (mTLS). The client communicates with the bridge, also via mTLS, and once both client and server have connected to the bridge, the client starts a TLS connection to the server using the connection to the bridge.
Prerequisites
In production, Siguldry should be run on at least three separate hosts.
Ideally, the server should be configured to drop all incoming network traffic (except that related to its established connections to the bridge) and should be managed out of band (e.g. through a management console, in person, etc).
The bridge should be configured to accept connections on the two ports it listens on. The server port should only accept connections from the server, and ideally the client port should also be restricted to a set of known clients.
Clients have no special requirements, but are expected to be running in a trusted environment.
In a test environment, all three services can run on the same host, or the server and bridge can be on the same host.
Logging
All services configure logging via environment variables. The default is to log Siguldry events at
INFO level and 3rd party library events at WARN level. Logging can be configured using tracing
directives to enable or disable particular logging statements.
To adjust the log level, use a systemd override file to set the appropriate environment variable for the service. The systemd unit contains a comment with examples and the expected environment variable.
Bridge
Assuming you’ve prepared the configuration and it is located in /etc/siguldry/bridge.toml, all you
need to do is start the service:
systemctl enable --now siguldry-bridge.service
The bridge does not store any state.
Server
The server is composed of several systemd services, a command-line utility called siguldry-server,
and some persistent state. The server stores its state, by default, in /var/lib/siguldry/. At this
time, it consists of a single SQLite database.
Note
To back up the server, save the contents of the state directory, and ensure you have backups to any PKCS#11 binding keys you may have configured. Backing up PKCS#11 devices is outside the scope of this guide.
Database
The SQLite database stores users, signing keys, OpenPGP and X.509 certificates for those signing keys, and per-user key access passwords. For signing keys stored in an HSM, it stores a record of how to access the HSM, rather than the signing keys themselves.
Caution
Always back up your database before applying a migration.
To create the database, or to apply new database migrations, run:
systemd-run --pty --wait --collect \
  --working-directory=/var/lib/siguldry \
  --setenv=SIGULDRY_SERVER_CONFIG=/etc/siguldry/server.toml \
  --property=UMask=017 \
  --uid=siguldry \
  --gid=siguldry \
  siguldry-server manage migrate
Importing Sigul Data
If you have an existing Sigul server that you wish to migrate to Siguldry, this
can be done via the siguldry-server manage import-sigul command. Before you begin, you
will need:
- The data directory for Sigul; this includes an SQLite database, as well as a number of directories for GPG keys, X.509 certificates, and PEM-encoded key pairs.
- The PKCS#11 device used for binding, if bindings were used with the Sigul server
- Some or all of the user passwords for the keys you wish to import.
You will be prompted for each user and key you wish to import.
Users
Users can be managed with siguldry-server manage users subcommands. You will need to
create at least one user before creating any keys.
For example, to create a user:
systemd-run --pty --wait --collect \
  --working-directory=/var/lib/siguldry \
  --setenv=SIGULDRY_SERVER_CONFIG=/etc/siguldry/server.toml \
  --uid=siguldry \
  --gid=siguldry \
  siguldry-server manage users create jcline
Note
The username used here must match the Common Name field of the client certificates you create to authenticate.
Users can also have their access to signing keys granted or revoked with the grant-key-access and
revoke-key-access commands respectively.
Keys
Keys can be managed with siguldry-server manage key subcommands.
For example, to create a key:
systemd-run --pty --wait --collect \
  --working-directory=/var/lib/siguldry \
  --setenv=SIGULDRY_SERVER_CONFIG=/etc/siguldry/server.toml \
  --uid=siguldry \
  --gid=siguldry \
  siguldry-server manage key create jcline test-key
You will be prompted to provide the user’s access password. This password is used to encrypt the key, so it should be a long, random value that you store safely in a credential manager.
Review the help text for key create as there are a number of optional values to control the key
type.
Note
Keys are created with both X.509 certificates and OpenPGP certificates
Services
The server’s primary systemd service is siguldry-server.service. There are two associated systemd
units to be aware of. siguldry-signer.socket is a systemd managed Unix socket configured to start
an instance of siguldry-signer@.service for each new connection to the socket. The main
siguldry-server.service unit sets BindsTo=siguldry-signer.socket, so there is no need to enable
the socket unit. The siguldry-signer@.service instance is the unit where signatures are performed.
Logs for a signing operation can be associated across the units via the session_id and request_id
fields.
To start with, enable the primary service:
systemctl enable --now siguldry-server.service
Next, if using PKCS#11 bindings, enter the PIN to unlock the binding device:
systemd-run --pty --wait --collect \
  --working-directory=/var/lib/siguldry \
  --setenv=SIGULDRY_SERVER_CONFIG=/etc/siguldry/server.toml \
  --uid=siguldry \
  --gid=siguldry \
  siguldry-server enter-pin
The server will now connect to the bridge.
Client
The client is primarily used via the libsiguldry_pkcs11.so PKCS#11 module. In order to isolate the
credentials from the PKCS#11 module, the siguldry-client-proxy.socket systemd socket is provided.
This spawns a siguldry-client-proxy@.service instance.
Socket Limits
Systemd enforces limits on the number of concurrent units created by sockets. The systemd default
is 64
and the default set by the unit shipped by siguldry is 256. You will want to adjust this limit if
you want more (or fewer) concurrent signing operations.
There are related system limits you must also adjust. The most important one is on the
systemd-provided systemd-creds.socket, which provides a varlink interface to decrypt secrets.
Upstream uses the default MaxConnections= setting, and sets the related
MaxConnectionsPerSource=
to 16. Each unit spawned by siguldry-client-proxy.socket will, assuming you use systemd-creds, use
a connection to decrypt the client’s private key and any key passphrases. Removing the
MaxConnectionsPerSource= setting and bumping MaxConnections= equal to or slightly more than the
value set by siguldry-client-proxy.socket is recommended.
siguldry-fedora-autopen
Start and enable the siguldry-fedora-autopen.service unit.
Note
This unit has a dependency on the
siguldry-client-proxy.socketunit.
The configuration file for this service includes a number of limits and tunables you should consider carefully in combination with the socket limits you’ved configured for siguldry-client-proxy.socket and systemd-creds.socket. The siguldry.concurrency option controls how many connections to siguldry-client-proxy.socket the service will make.
AMQP
In addition to configuring how to connect to the AMQP broker, the amqp configuration section includes two tunables: prefetch_count and redelivery_delay.
Prefect Count
The prefect_count setting controls how many unacknowledged messages the broker will deliver. Messages are processed concurrently, and each message will result in at least one signing request, but typically will involve multiple requests. For example, a Koji build will contain multiple RPMs which must each be signed. Other, content-specific limits apply, but this is the top-level concurrency tunable.
Redelivery Delay
If a message is not processed successfully, it will be requeued and redelivered by the broker. Sometimes this is because there’s a client bug, or the message is otherwise referencing “bad” data. At the moment, the AMQP client does not dead-letter messages, so it will spin forever on a bad message until an admin examines it.
The redelivery_delay is an artifical delay applied to a message that is flagged as being previously delivered to ensure we don’t spin too fast.
RPM
Each RPM is signed by running an rpmsign subprocess. When IMA is enabled, this will start a new siguldry-client-proxy.socket connection so siguldry.concurrency roughly controls how many RPMs will be signed at the same time.
However, because rpmsign requires the entire RPM file, another limit is available. The rpm.storage_limit_mb will limit, in Mebibytes, the amount of space used to download RPMs. The appropriate value for this is, unfortunately, somewhat tricky to calculate. RPMs are downloaded to /tmp, and rpmsign may make a copy of the RPM while signing, so you should ensure that tmp.mount is configured such that it’s at least twice as large as storage_limit_mb, and storage_limit_mb must also be larger than the largest RPM you wish to sign.
Storage is granted in the order it is requested, so if your limit is set to 1000, 500 is currently in use, and an RPM arrives that needs 950, no additional RPMs will be granted space until sufficient room is available for the RPM that needs 950.
Metrics
The service provides optional Prometheus-compatible metrics. Setting the metrics.http_listener configuration option will enable these metrics. Be aware that if you use a port other than 9000, you must adjust the SocketBindAllow= setting on the siguldry-fedora-autopen.service.
Signing
Once the server, bridge, and client(s) are configured, we can now sign things.
Signing should be done with the Siguldry PKCS #11 module. While it can be used manually, Fedora automates signing content using its AMQP message broker that its build services connect to.
siguldry-pkcs11
First, here’s some examples of how various content can be signed using the siguldry-pkcs11 library. This is a PKCS #11 module, which is an API many popular libraries and tools understand.
Configuration
As a PKCS #11 module is a dynamic library loaded by other programs, the primary way to provide configuration is by environment variable.
The module reads three environment variables:
LIBSIGULDRY_PKCS11_PROXY_PATH- if set, it should contain the absolute path to the Unix socket provided bysiguldry-client proxy. The default is/run/siguldry-client-proxy/siguldry-client-proxy.socket, which matches the systemd unit.LIBSIGULDRY_PKCS11_LOG- if set, it is used to configure the logging filter via envfilter directives. The default log level isWARN.LIBSIGULDRY_PKCS11_KEYS- if set, it should contain a comma-separated list of Siguldry key names, any only these keys will be exposed as tokens by the module. The primary use-case is for tools, primarily gnupg-pkcs11-scd, which don’t handle multiple tokens well.
OpenSSL CLI
You can use the module with the OpenSSL CLI. For example:
$ PKCS11_PROVIDER_MODULE=path/to/libsiguldry_pkcs11.so openssl \
    pkeyutl -sign -rawin \
    -provider pkcs11 -inkey 'pkcs11:token=siguldry-key-name' \
    -in a_file -out a_file.sig
    -digest sha256
GPG
It’s possible to use gpg2 with the module via gnupg-pkcs11-scd.
After installing gnupg-pkcs11-scd, add some configuration:
# Configure gpg-agent to use gnupg-pkcs11-scd
$ cat <<EOF >> "$GNUPGHOME/gpg-agent.conf"
scdaemon-program /usr/bin/gnupg-pkcs11-scd
EOF

# Configure gnupg-pkcs11-scd to use the Siguldry PKCS#11 module
$ cat <<EOF >> "$GNUPGHOME/gnupg-pkcs11-scd.conf"
providers siguldry
provider-siguldry-library /path/to/libsiguldry_pkcs11.so
EOF
Once the agent is configured, fetch the OpenPGP certificate from the Siguldry key using
siguldry-client key (todo implement this command) and import the public key:
$ gpg --batch --import cert.asc
$ gpg --card-status
Finally, sign something:
$ gpg --batch --detach-sign --output a_file.sig a_file
$ gpg --verify a_file.sig a_file
Sequoia
Siguldry exposes its keys in the format used by Sequoia’s cryptoki backend. If using the default
values for sq, Sequoia expects the configuration in
$HOME/.config/sequoia/keystore/cryptoki/config.toml, but if you specified a custom SEQUOIA_HOME the
file should be placed at $SEQUOIA_HOME/config/keystore/cryptoki/config.toml:
$ cat <<EOF >> "$HOME/.config/sequoia/keystore/cryptoki/config.toml"
[[modules]]
path = "/path/to/libsiguldry_pkcs11.so"
EOF
Once the agent is configured, fetch the OpenPGP certificate from the Siguldry key using
siguldry-client key (todo implement this command) and import the public key and mark it trusted:
$ sq cert import cert.asc
$ sq pki link add --cert=<fingerprint> --all
Finally, sign something:
$ sq sign --signer=<fingerprint> --signature-file=a_file.sig a_file
$ sq verify --signature-file=a_file.sig a_file
rpmsign
You can sign RPMs using rpmsign via either Sequoia or GPG as described above. It can be used for
both the OpenPGP signature and IMA file signatures. Assuming you have configured Sequoia as
described above:
# The SubjectKeyID is from the X509 certificate associated with the signing key; you can provide
# any positive integer to test this out.
$ rpmsign --addsign --rpmv6 --signfiles \
    --define='_openpgp_sign sq' \
    --define='_openpgp_sign_id 44431F5254FE5E31ADCC6EEE2F9ED88F2EEDB782' \
    --define='_file_signing_key_id <SubjectKeyId>' \
    --fskpath "pkcs11:token=ima-signing-key" \
    cloud-init-25.2-10.fc43.noarch.rpm
If you only want an OpenPGP signature, omit the --signfiles, --fskpath, and
_file_signing_key_id definition.
systemd-measure
You can sign the current set of PCR values with:
$ /usr/lib/systemd/systemd-measure --private-key="pkcs11:token=pcr-signing-key" \
    --private-key-source="provider:pkcs11" \
    --certificate=./pcr-signing-cert.pem \
    sign --current --bank=sha256
Container Signing
The recommended method for signing Container Images is using Cosign. Depending on how you want to manage the cosign binary, there are different signing flows which are explained below.
Cosign with PKCS#11 Support
You can sign container images directly using cosign if it was compiled with PKCS#11 support (which is not the default). More information on this can be found in Cosign’s documentation here.
With the proxy running, you can list keys using the following command. This will output longer-format PKCS#11 URIs, but the token= style ones used above should also work (though you may need to append ;object= with the same key name to the PKCS#11 URI). The certificate must also have a SAN set to an email: or URI: value.
$ COSIGN_PKCS11_MODULE_PATH=/path/to/libsiguldry_pkcs11.so cosign pkcs11-tool list-keys-uris
And then sign an image with:
$ COSIGN_PKCS11_MODULE_PATH=/path/to/libsiguldry_pkcs11.so cosign sign --output-signature=signature.base64 --output-payload=payload.json --key 'pkcs11:token=siguldry-key-name;object=siguldry-key-name' <image reference>
When testing, you may want to use --upload=false --use-signing-config=false --tlog-upload=false to disable certificate transparency as it will cause issues when repeatedly signing the same payload, or if you don’t have permission to push to the registry.
The signature can then be verified with the public key from Siguldry:
$ COSIGN_PKCS11_MODULE_PATH=/path/to/libsiguldry_pkcs11.so cosign verify-blob --key "pkcs11:token=siguldry-key-name;object=siguldry-key-name" --signature=signature.base64 payload.json
You will need to add --insecure-ignore-tlog=true if you didn’t upload the certificate transparency log entry.
Cosign with OpenSSL Signing
To avoid needing to recompile Cosign with PKCS#11 support, you can also use the OpenSSL CLI to generate a signature and then verify it with Cosign. This is more manual, but may be easier for testing. More information about this flow can be found here
Generate the payload for signing:
$ cosign generate <image reference> > payload.json
Then sign the payload with OpenSSL:
$ PKCS11_PROVIDER_MODULE=/path/to/libsiguldry_pkcs11.so openssl \
    pkeyutl -sign -rawin \
    -provider pkcs11 -inkey 'pkcs11:token=siguldry-key-name' \
    -in payload.json -digest sha256 | base64 > signature.base64
You can use the same Cosign command as above to verify the signature, and the below command to publish the signed version.
$ cosign attach signature --payload payload.json --signature signature.base64 <image reference>
Note that signing using this method will not produce a certificate transparency log entry. Cosign will recognize this and skip the check, but it does result in a less cryptographically-sound verification process.
siguldry-fedora-autopen
Rather than manually signing every piece of content, you can automate the process.
siguldry-fedora-autopen is a service that connects to an AMQP broker and consumes messages as published by fedora-messaging. It supports automatically signing RPMs built in Koji when tagging events occur, OSTree repositories, and CoreOS artifacts. It uses the siguldry-pkcs11 module to perform signing.
Design
This is a high-level description of the design of Siguldry.
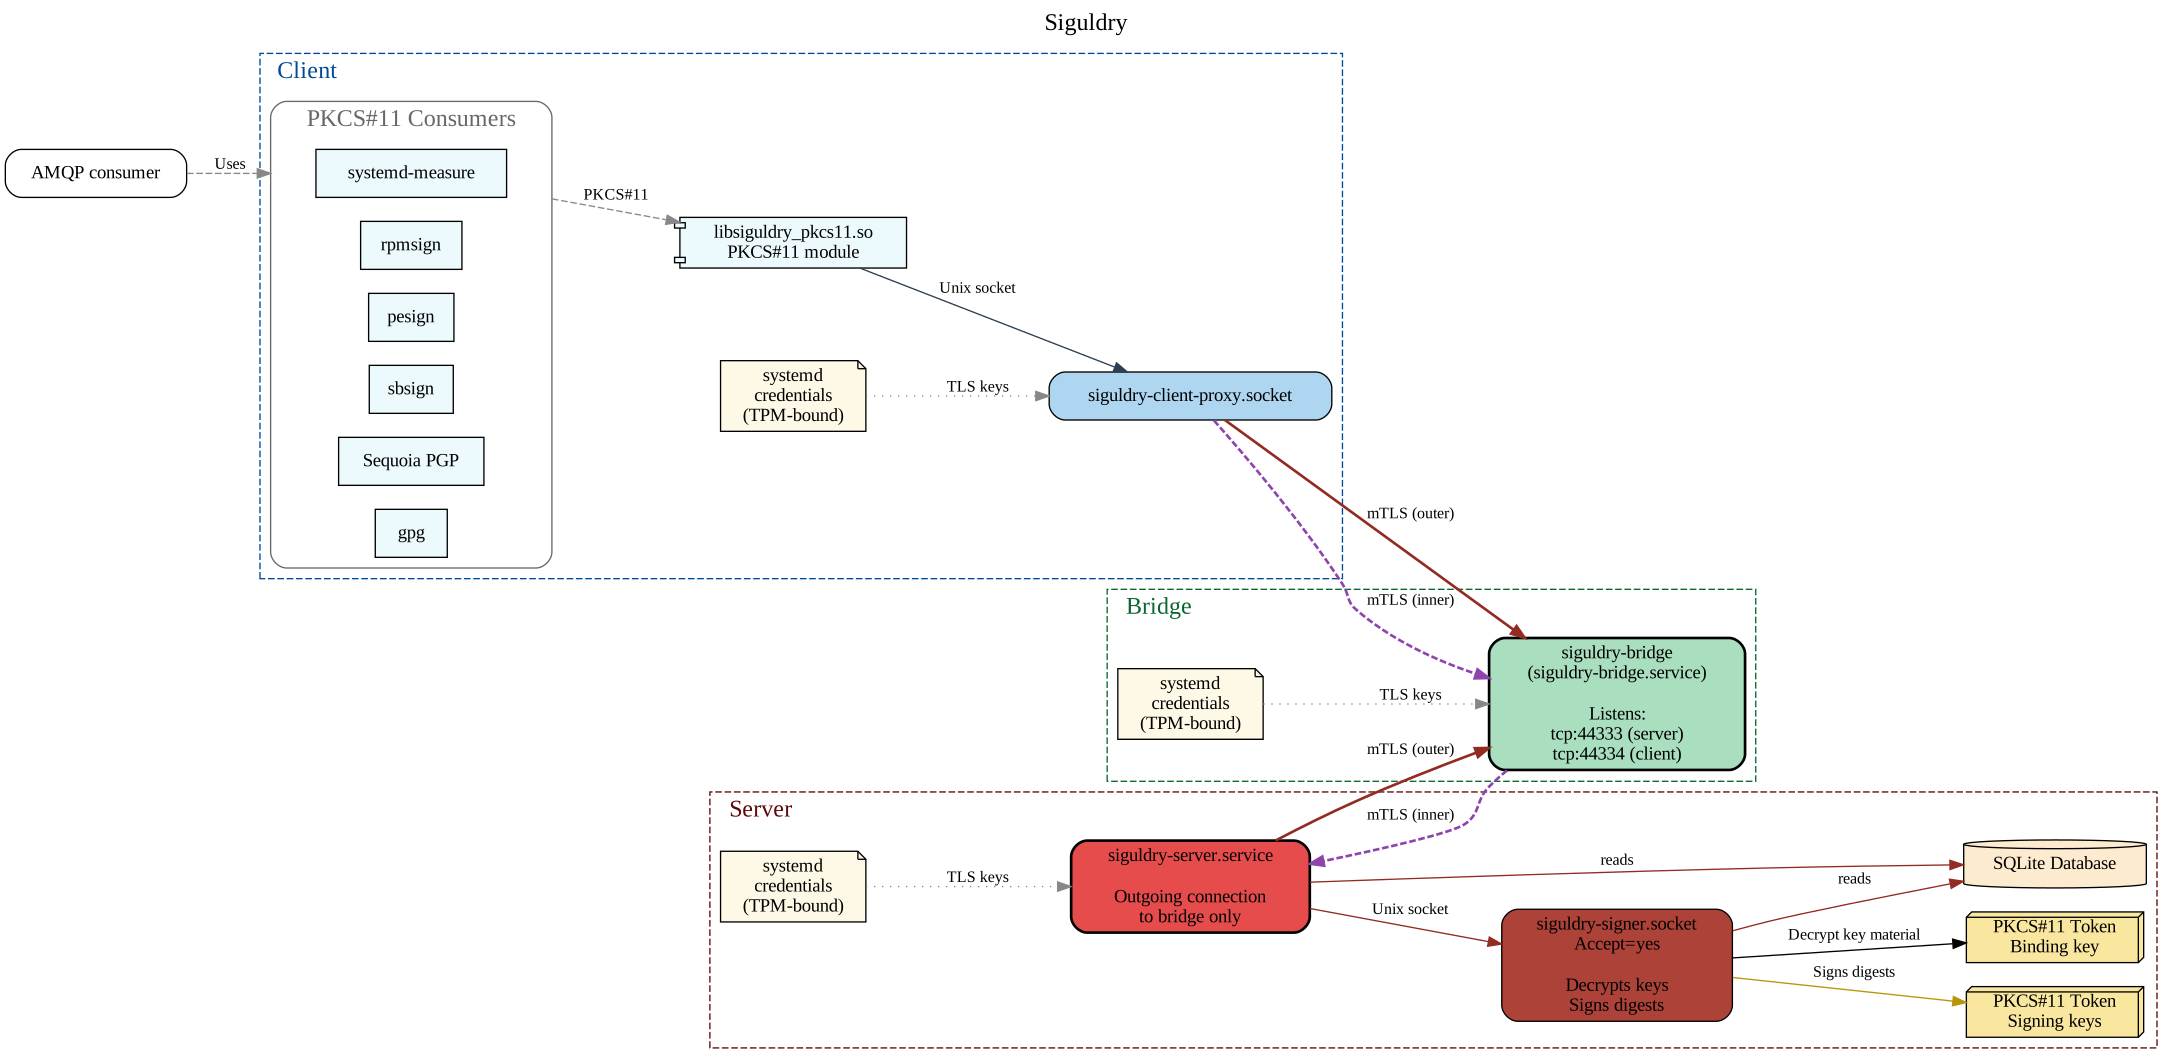
Siguldry leans heavily on systemd sandboxing and encryption features, and is not expected to work without them. Every service is expected to use systemd credentials for private keys used for TLS authentication and for key passwords used by clients. Socket-activated services are used to isolate client connections from each other and to ensure key material is never decrypted in the network-facing service.
Server
The server component of Siguldry does its best to isolate the keys, whether they are hardware-backed or stored in the database, and only allow authenticated users to sign content. It does not make decisions about what should and should not be signed. It is also designed to not allow the keys to be extracted by users of the service.
It’s important to note that while the server fills a similar role to a hardware security module, there’s not necessarily any hardware preventing a malicious administrator from exfiltrating the database containing signing keys. While the keys are encrypted with per-user credentials, the users that are administrating the server may also have access to credentials for a key.
Each client connection’s signing operations are isolated from the main signing service and other connections using a systemd-managed socket-activated “helper” service. This helper, running in a separate process with additional systemd sandboxing features, is the only place signing keys are decrypted.
Key Storage
Signing keys are stored either in an SQLite database, or are provided by PKCS#11 tokens that have been registered with the service.
Database Signing Keys
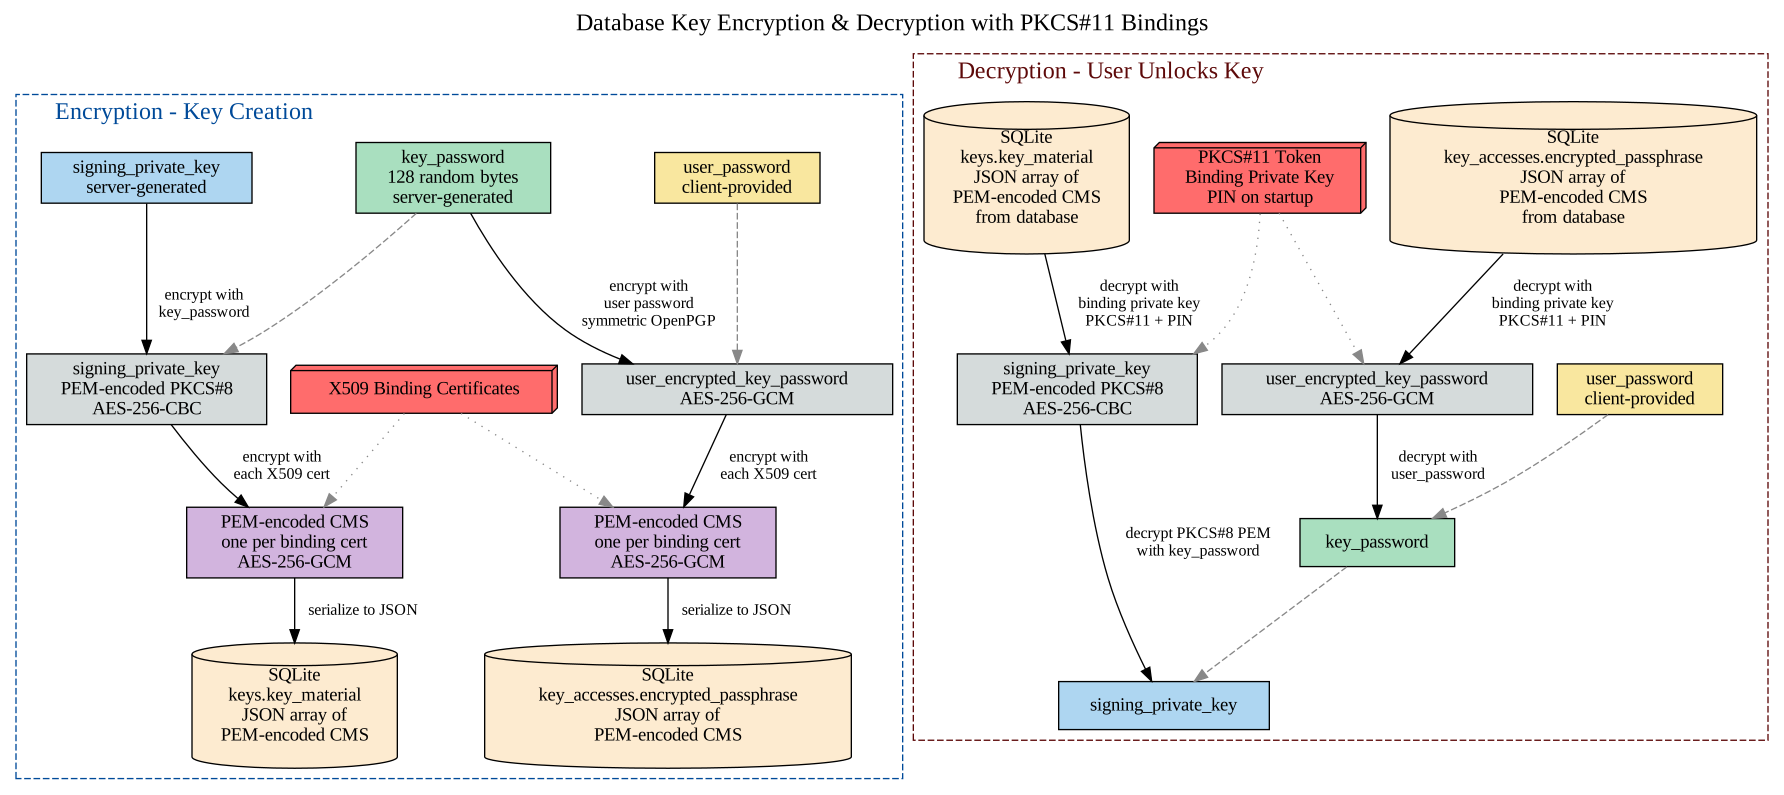
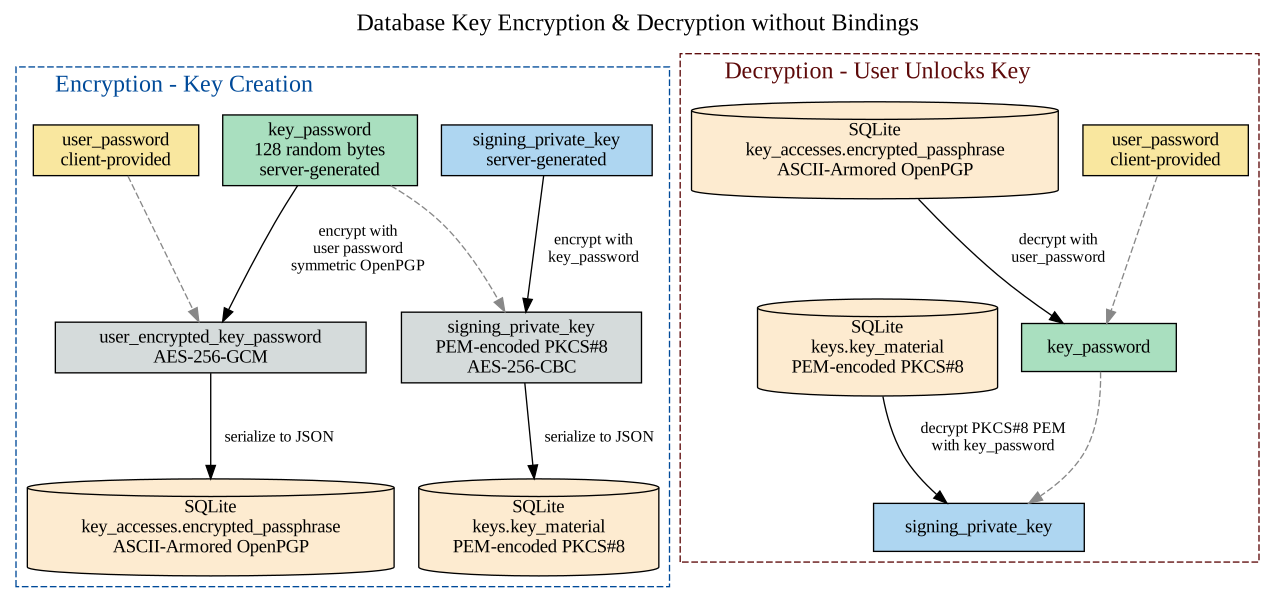
Private keys in the database are stored as PEM-encoded PKCS#8 EncryptedPrivateKeyInfo structures using AES-256-CBC. The passphrase used to encrypt the key is 128 bytes of cryptographically strong pseudo-random bytes generated on the server from OpenSSL’s RAND_priv_bytes interface. These bytes are then base64-encoded and the result is used as a passphrase. This passphrase never leaves the server.
The passphrase is encrypted for each user that is granted access to the signing key using their personal access key. This is done using Sequoia OpenPGP using AES-256-GCM. Since the signing service is expected to be used by service accounts, there is no key derivation function applied to these personal access keys. Fedora uses 64 byte random strings.
Optionally, the server can be configured with “bindings”. If configured, both the PEM-encoded PKCS#8 EncryptedPrivateKeyInfo and the user’s personal access key are further encrypted using a list of X509 certificates provided in the server configuration. These certificates should correspond to private keys stored in a hardware token accessible via PKCS#11. For each certificate in the list, the key and user personal access key is encrypted to a CMS structure using AES-256-GCM. The list of encrypted keys and user personal access keys passphrases are then serialized to JSON and stored in their respective database tables.
When configured with bindings, at least one of the configured binding certificates must be accompanied with the PKCS #11 URI to the associated private key. On server startup, the system administrator provides the user PIN needed to access that private key, which is used to decrypt the EncryptedPrivateKeyInfo structures and users personal access keys.
For example, the encrypted_passphrase column in a key_accesses database entry would look like
this if no bindings are configured:
[
  {
    "None": {
      "secret": "-----BEGIN PGP MESSAGE-----\n\nw0wGGgkDCwMIKoQnCYAo+p7/ASQVDKXQHsJQgRXYNaxsJFM/aCWdtifXq5ISLQCs\n9Z30Hu9kMijeq0XW0ft/S7o/72kfF46zmtEgt+kl0lsCCQMGAt8yECM9A3CSXQvg\nsO0W6FFwadq+Rop/ltpQvNNnuDv2VIb4PgbZddi6lm9omoCssU8duth2KZiFq7dz\niapgan577BXP86LIMKFka95Hp0eSVpNr/jwk\n-----END PGP MESSAGE-----\n"
    }
  }
]
If bindings are configured, the entry would look like:
[
  {
    "Pkcs11WithCMS": {
      "fingerprint": "87ACAE45EB6436A78A425389F7925C549CCA33527EB0563CD325D2B180E2E7F2",
      "secret": "-----BEGIN CMS-----\nMIIC2gYLKoZIhvcNAQkQARegggLJMIICxQIBADGCAVMwggFPAgEAMDcwHzEdMBsG\nA1UEAwwUc2lndWxkcnktYmluZGluZy1rZXkCFFcbvBPbtFsk+9QtrZ7HcyJ96YNJ\nMA0GCSqGSIb3DQEBAQUABIIBADFlQzT9vdoQl0aL0VbAIcn/CljfxxtfYNHZfZBk\ngymO7qt6o8lMqpn4+P1RT0byn3whDF8Zbi+pDjYTBPPug5frfPksrYm5jjGI3Zhe\n/YIGrqdXJl/hQ0ZRcp+SkUdchEjO2dqTlP0SF6jg9OvVMVAE9YNZnNexWOQ3g13q\nyiM8dINe3OP/wnudVo4F1mslCDJshPMIRhSF+CLTZYFE+RNGvgLAG13WUNgl5RY8\nt0oZN7Gk717f1jUQHGrkbelnJad4ajA+EZxR6L0nRJLPeqHd2lf6n70CeKumQjBP\n5LzXavP7hOnYJCqA8Nv2N9rVGvomNPbYh4ryrQE97HgngEYwggFVBgkqhkiG9w0B\nBwEwHgYJYIZIAWUDBAEuMBEEDG6+qCHM6cQ6zhyD9gIBEICCASbMbmqHzUZKtNms\nNmGyr+QNa1+Nm+kEio4zcnfigJZ4bc54Z1hXOGUbtEsYigtZyyyjnHyoot/6bU3+\np7wqMofQMMgZVFnp3DBcfUYUXW3EyEDILOxfNJao6yDl2fwAb2l9x9bzJu7HqkSo\nK1Nplc6mqBtkZmed3CehLHrA80NfysC10jXaSPZul3vyKEzvSyds1dvETpwq8c/V\n4co83bwdrIpSe6IxAtRrz1i2wTEbYHsQcTZ4mnN0kvkaL0yYMW/m+el3isESAM5V\nIPScd45sGmT4ocESKB2AXe6kETorq95zzcEpKsdEhSneOn60zIndsz7sC8NTrZJO\nIgUCUf3EOrun+7bsrKyDKzJrabMne7jwKVl5/O7j8vCPoMnWqaaBYGfwURMEEF7L\njFoHe9PbvoWR0LXx4P4=\n-----END CMS-----\n"
    }
  }
]
With bindings, a malicious actor needs to steal both the SQLite database and the PKCS#11 token used for binding to access the keys.
Encrypting and Decrypting with Bindings
Encrypting and Decrypting without Bindings
PKCS#11 Signing Keys
For signing keys stored in a token accessible via PKCS#11, the administrator registers the token and, as part of registration, provides the token’s user PIN. This PIN is treated in the same manner as the server-generated password for a database key: it’s encrypted with a user’s personal access key, and then encrypted with any binding X509 certificates.
Siguldry never stores the actual private key material for signing keys backed by PKCS#11 tokens. At this time, administrators must use standard tools like pkcs11-tool to manage the tokens outside of Siguldry.
PKCS#11 tokens may store multiple key pairs, and there’s only one user PIN protecting them. Siguldry clients never have access to the PIN itself. If a client has been granted access to one key in a token, the server does not allow the client to perform signing operations with other keys in the token. However, this is a server-enforced rule rather than a cryptographically-enforced restriction so a flaw in the server could allow clients to perform signatures using other key pairs in a token it has been granted access to.
Granting Key Access to Users
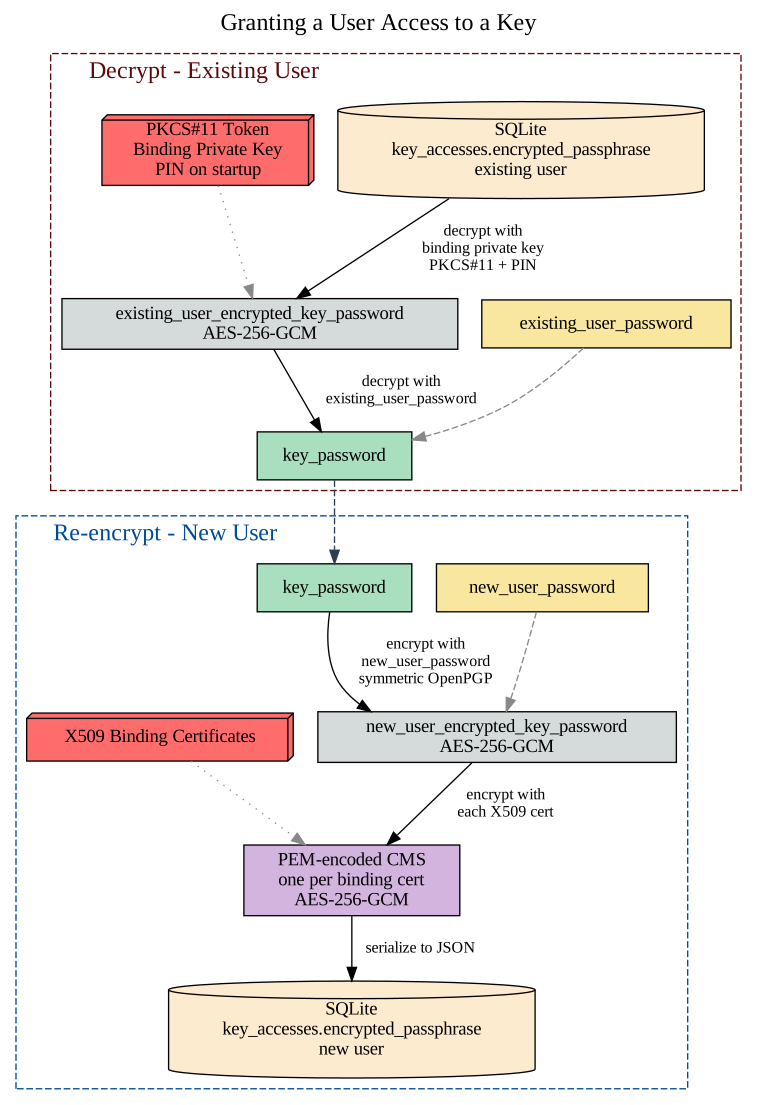
After a key is created, it is encrypted with the creating user’s key as well as any binding keys. To grant additional users access to the key, the initial user must provide their access key, as well as the access key of the new user.
Client Access
The main server process, run by the siguldry-server.service systemd unit, connects using mutually TLS to the bridge service. The bridge service is discussed in depth later, but is essentially a proxy with strong authentication requirements.
Other than this outgoing TCP connection to the bridge, the server expects to be isolated from other hosts. While allowing other network access to the server should be safe (e.g. the server does not listen on any network interfaces), care should be taken since that makes it easier for unauthorized users to access the keys stored in the database.
The server only accepts client connections using its outgoing connection to the bridge. It does this by treating the bridge connection as an incoming connection after the handshake is complete. This nested TLS session also uses mutual TLS to authenticate the client. The client is identified by the Common Name field in its client certificate. The value of that field must match a user in the database or the connection is dropped.
Signing
This main service is configured in the systemd unit to have read-only access to the data directory containing the database as it needs to look up user and key information, but for keys stored in hardware tokens, the main service should not be granted access to those devices.
There is a second systemd service and an associated systemd socket, siguldry-signer@.service and
siguldry-signer.socket respectively. systemd starts a new siguldry-signer@.service instance for
each connection opened with the Unix socket it is configured to listen on. By default, this socket
is /run/siguldry-signer/signer.socket. The main service process opens a connection to this Unix
socket for each client connection.
This helper service is the only place signing keys are accessed. As such, this service may need to be adjusted by users to grant it access to hardware tokens. However, beyond that, the service is intended to be as locked down as possible: the entire filesystem is mounted read-only, it has no network access, and it should opt into as many of the sandboxing capabilities systemd provides as possible.
Bridge
The bridge component of Siguldry is designed to allow access to the server, but only if the client can successfully authenticate using mTLS. Beyond this, the bridge ferries bytes between the client and server. The client establishes a nested TLS session with the server so the bytes cannot be inspected or tampered with by the bridge.
Client
The client is expected to run in a trusted environment, and the program invoking the client is expected to be responsible for policy decisions about what will and won’t be signed.
The primary interface for signing is provided by the libsiguldry_pkcs11.so PKCS#11 module combined
with a systemd service that proxies requests from a Unix socket to the server. This client proxy can
be configured to unlock one or more signing keys, in which case users of the PKCS#11 only need to be
able to access the Unix socket. If the client proxy isn’t configured to unlock keys, the user is
responsible for unlocking the key using the personal access key as the user PIN.
Differences with Sigul
This section is intended for users who are familiar with the Sigul design and want to know what’s different.
The primary reason for these changes are because the way Fedora Infrastructure deploys Sigul is very different from how Sigul was originally expected to be used. If we assume the client is trusted, as Sigul could not, a number of complicated aspects of the protocol go away.
The Client
Originally, Sigul was designed for the client to be used by individual Fedora contributors. Thus, great care was taken in the Sigul bridge and server to validate client input.
Siguldry, on the other hand, assumes the client is run in a trusted environment. It expects the users of the client to handle validating the input should be signed. For example, in Fedora it is expected that signing is triggered via AMQP messages. The consumer of those messages must validate the content before requesting a signature from the Siguldry client.
The Bridge
One major difference with Sigul is that all client-server communication happens in the nested TLS session, and as such, it is no longer possible to mix traffic to the inner and outer TLS sessions: after the protocol header is sent to the bridge, all traffic must be sent via the inner session.
The primary reason in Sigul to allow the bridge to inspect traffic between the client and server was to perform validation of that content. As noted in the client section, the client was not entirely trusted, so the bridge was responsible for checking if, for example, the RPM built in Koji.
Since Siguldry assumes the client is trusted, there’s no reason for the bridge to inspect traffic. Removing this makes handling the traffic easier for clients and servers, too, since they no longer need to track inner vs outer TLS session traffic.
The Server
In Sigul, the server was aware of the type of content it was signing. It ran rpmsign to handle
RPMs, for example. This meant that content needed to be sent to the server, and that the tooling
available on the server had a significant impact on what content was supported. Old versions of RPM
on the signing server meant Fedora couldn’t take advantage of some new features.
In Siguldry, the server signs digests. It does not need to be made aware of new types of content, and the versions of the tools available in the operating system the server runs don’t impact the types of content it can sign.
The signatures algorithms it is capable of still depend on what version of OpenSSL the server has.
The database schema is very similar, and it is possible to migrate Sigul data to Siguldry. The key storage scheme is nearly identical.
Contribution Guide
Thanks for considering contributing to Siguldry, we really appreciate it!
Development Setup
Rust
To build and test this project, you will need a relatively recent version of
Rust. The current required version is documented in the Cargo.toml
The minimum supported Rust version tracks the latest toolchain available in Enterprise Linux releases. For example, when RHEL 10.1 was released, the MSRV was bumped from 1.84 to 1.88.
System Dependencies
A few dependencies from your distribution are also required to build all the crates and run the test suite. This is expected to run on Fedora or RHEL, although it should work elsewhere.
dnf install -y \
  clang \
  kryoptic \
  opensc \
  openssl \
  openssl-devel \
  pesign \
  pkcs11-provider \
  pkg-config \
  python3-devel \
  sequoia-sq \
  sqlite-devel
If you want to run the full test suite including the tests for migrating a Sigul database to Siguldry, you will also need podman and podman-compose to generate the test data:
dnf install podman podman-compose
cargo xtask generate-sigul-data
Finally, the test suite runs via nextest. While running with cargo test
may work with a single test thread, this is not recommended or checked regularly:
cargo install --locked cargo-nextest
cargo nextest run
Licensing
Your commit messages must include a Signed-off-by tag with your name and e-mail address, indicating that you agree to the Developer Certificate of Origin version 1.1:
Developer Certificate of Origin
Version 1.1

Copyright (C) 2004, 2006 The Linux Foundation and its contributors.

Everyone is permitted to copy and distribute verbatim copies of this
license document, but changing it is not allowed.

Developer's Certificate of Origin 1.1

By making a contribution to this project, I certify that:

(a) The contribution was created in whole or in part by me and I
    have the right to submit it under the open source license
    indicated in the file; or

(b) The contribution is based upon previous work that, to the best
    of my knowledge, is covered under an appropriate open source
    license and I have the right under that license to submit that
    work with modifications, whether created in whole or in part
    by me, under the same open source license (unless I am
    permitted to submit under a different license), as indicated
    in the file; or

(c) The contribution was provided directly to me by some other
    person who certified (a), (b) or (c) and I have not modified
    it.

(d) I understand and agree that this project and the contribution
    are public and that a record of the contribution (including all
    personal information I submit with it, including my sign-off) is
    maintained indefinitely and may be redistributed consistent with
    this project or the open source license(s) involved.
Use git commit -s to add the Signed-off-by tag.